Hello!
My name is Maxim Suhanov and this is my first post in this blog. Let’s begin!
Live forensic distributions are extensively used during the triage and acquisition stages of digital media examination. Many practitioners rely on these distributions to perform a forensically sound acquisition of suspect media.
But how do examiners ensure that this acquisition process is forensically sound? Basically, there are four sources to consider when evaluating a tool: claims made by a vendor of a given tool, validation reports from a third-party organization (e.g., NIST), experience shared by other practitioners in the field, and tests conducted by you. The last one is the most important one.
Do you know how to conduct a validation test against a live forensic distribution? Sounds easy… Also, there are some validation guidelines published online. But such tests typically utilize a black-box setup: write known data to a drive – perform an acquisition – compare a copy to original (known) data; and I found that it’s extremely hard to catch many issues with the forensic soundness when performing such black-box tests.
This is why I decided to start a series of blog posts to demonstrate and explain these issues.
What happens when a live distribution is starting up?
The boot process of a typical live distribution based on Linux can be split into these stages:
BIOS/UEFI – boot loader – kernel & initramfs – root file system
- BIOS/UEFI. Code from BIOS/UEFI images and other firmware components (e.g., Option ROM) is executed during this stage. At the end of the stage, a boot device is selected and the execution is transferred to a boot loader found on that device. There is no easy way to mitigate implicit changes to a suspect drive during the BIOS/UEFI stage. However, I am not aware of any issues of this kind.
- Boot loader. At this stage, a boot loader is executed. In Live CD/USB configurations, a boot loader typically displays a list of available boot options and allows a user to choose one. At the end of the stage, a boot loaders loads a kernel and an initramfs image by reading them from a boot drive (or another drive, but live distributions use a boot drive to store a kernel and an initramfs image), then the execution is transferred to a kernel. A boot loader can write to a suspect drive, so it’s necessary to configure it not to do so. However, I am not aware of any default Live CD/USB configurations including a boot loader configured to write something to an internal drive.
- Kernel & initramfs. A kernel does some initialization stuff and then starts the so-called “early userspace” from an initial RAM file system (initramfs). The early userspace is responsible for loading necessary kernel drivers, for locating and mounting a root file system image (typically, this is a SquashFS image, but some initialization systems support traditional file systems written as a file to a boot drive or even a separate directory on a boot drive used as a root for a live system). The initramfs scripts can and sometimes do write to a suspect drive. This will be discussed in a future post.
- Root file system. At this stage, most of the low-level initialization stuff has been completed and the operating system is starting its services (networking, user interface, and so on).
The first userspace program executed is called “init”, the usual path for this program is “/sbin/init”. When the early userspace starts, the first program executed from the initramfs image is “/sbin/init”. When the root file system is mounted and the early userspace isn’t needed anymore, the mounted initramfs image is discarded and the “/sbin/init” file is executed from the mounted root file system.
Also, when the early userspace is running, the “/” directory is the root of the mounted initramfs image. When executing the “/sbin/init” file from the root file system (the real one), this file system is mounted to the “/” directory.
What is the problem?
The problem is how different components of a live distribution read data from a boot drive.
Let’s take a look at a boot loader (GRUB, syslinux, or something else).
First. How does a boot loader read its configuration file, a kernel and an initramfs from a boot drive?
When running on a UEFI-based computer, a boot loader uses the UEFI services (thus, the firmware code executed when these services are called) to read sectors from a drive (more specifically, the “EFI_BLOCK_IO_PROTOCOL” protocol is used). Use the “make_devices” function (GRUB) as a starting point if you need more details.
When running on a BIOS-based computer, a boot loader uses the 0x13 BIOS interrupt to do the same (it should temporarily switch the execution to the real mode in order to use this interrupt). Explore the “grub_biosdisk_rw_standard” function (GRUB) if you need more details on this.
The EFI BLOCK IO protocol and the 0x13 BIOS interrupt are capable of reading sectors from any drive visible to the system. So, here comes the next question…
Second. How does a boot loader pick a boot drive to read data from (if there are two or more drives visible to the system)?
The answer is simple: the firmware provides information about the current boot drive.
On a UEFI-based computer, a boot loader uses the “EFI_LOADED_IMAGE_PROTOCOL” protocol to obtain a handle to the device containing a boot loader’s executable image (see the “grub_machine_get_bootlocation” function in GRUB).
On a BIOS-based computer, the DL register is set (by BIOS code) to a number referring to the current boot drive (this number will be saved to a variable by a boot loader, the number is later used to fire the 0x13 BIOS interrupt, it’s usually set to 0x80 when booting from a USB drive). If you need a reference, take a look at this piece of code (GRUB).
So, a boot loader knows the identifier for a boot drive and can use this identifier to read sectors from a boot drive. Thus, a boot loader can read its configuration file, as well as a kernel and an initramfs image.
Third. How does the kernel and early userspace pick a boot drive to read data from?
We are so close! A kernel can use the UEFI services and 0x13 BIOS interrupt to read data from a drive, but there are reasons not to do this:
-
This is slow and unreliable: native drivers for storage devices work faster and handle different issues (e.g., unreadable sectors and hot swapping) properly.
-
This is not how things work in modern operating systems: a firmware interface isn’t used when reading and writing data after the early boot sequence has completed.
So, a kernel loads native drivers for storages devices and then enumerates these devices. During this stage, you will see kernel messages about block devices (“sda”, “sdb”, and others) recognized in the system, just like this one:

Let’s consider the following setup:
-
sda – the first internal drive (HDD),
-
sdb – the second internal drive (HDD),
-
sdc – the boot drive (USB Flash).
How does the kernel and early userspace know that the “sdc” drive is the boot one? First of all, a handle used to access a block device using the UEFI services means nothing for a native driver; the same goes for a BIOS drive number. There is no way to convert such an identifier to a kernel block device like “sdc”.
When BIOS manufacturers realized this problem, they made an extension to the BIOS interface, which allows a boot loader to retrieve a full path to the storage device by its BIOS number (this path includes information like a host bus type, an interface type, a USB serial number for USB devices, and more). This path can be transmitted to a kernel, which can use it to locate the right boot drive.
But it was too late, most operating systems implemented their own ways to resolve a firmware identifier of a boot drive into a corresponding kernel identifier. This interface remains unused and still isn’t well-tested.
A similar interface exists in UEFI services, but most operating systems don’t use it too.
So, how do operating systems do the magic?
Different implementations exist in various live distributions based on Linux.
Some of them (e.g., Fedora Desktop) are searching for a block device with a specific file system label, which is obtained by a boot loader from its configuration file and then transmitted to the kernel and early userspace as a part of the kernel command line.
In this case, programs running in the early userspace parse the kernel command line, extract the file system label, and then look for a file system having exactly the same label, which, when found, is considered to reside on a boot drive (the file system label is considered to be unique to a given computer, this label may include the name and the version of the live distribution). Later, the boot drive discovered is mounted and a root file system image (like a SquashFS image) stored on this drive is mounted, usually without being read into memory in full, as a new root for a live system (since such an image is large enough, it can’t be loaded by a boot loader, thus an operating system can’t bypass the “find the boot drive” step).
Live distributions based on Ubuntu use a different approach. Instead of using a file system label or a similar signature, they mount and probe all available file systems one by one (until a mounted file system contains files and directories similar to what boot drives should have).
Also, there is an optional UUID check (which can be enabled when building a live distribution): during the generation of an ISO 9660 image, an UUID is written to a file residing in the ISO 9660 image and the same UUID is also written to a file residing in the initramfs (which is also located in the same ISO 9660 image). Programs running in the early userspace obtain the UUID from the initramfs (which was loaded by a boot loader and mounted by the kernel as a root file system for the early userspace) and then compare it against an UUID extracted from a currently mounted (probed) file system (if they match, the currently mounted file system is considered to be on the boot drive, otherwise the file system is unmounted and the next block device containing a file system is mounted and probed).
Let’s focus on live distributions based on Ubuntu. In particular, let’s examine the initramfs scripts from an Ubuntu 18.04 Desktop image. To do so, we need to get the initrd.lz file from the casper directory in the bootable image and then extract it using the following command: “lzcat initrd.lz | cpio -imd” (this will extract all files and directories from the archive to the current directory, thus you might also want to put the initrd.lz file into another directory).
The function used to locate a live file system (a file system on a boot drive) is in the scripts/casper file, here it is:
find_livefs() {
    timeout="${1}"
    # first look at the one specified in the command line
    if [ ! -z "${LIVEMEDIA}" ]; then
        if check_dev "null" "${LIVEMEDIA}" "skip_uuid_check"; then
            return 0
        fi
    fi
    # don't start autodetection before timeout has expired
    if [ -n "${LIVEMEDIA_TIMEOUT}" ]; then
        if [ "${timeout}" -lt "${LIVEMEDIA_TIMEOUT}" ]; then
            return 1
        fi
    fi
    # or do the scan of block devices
    for sysblock in $(echo /sys/block/* | tr ' ' '\n' | egrep -v "/(loop|ram|fd|md)"); do
        devname=$(sys2dev "${sysblock}")
        [ -e "$devname" ] || continue
        fstype=$(get_fstype "${devname}")
        if /lib/udev/cdrom_id ${devname} > /dev/null; then
            if check_dev "null" "${devname}" ; then
                return 0
            fi
        elif is_nice_device "${sysblock}" ; then
            for dev in $(subdevices "${sysblock}"); do
                if check_dev "${dev}" ; then
                    return 0
                fi
            done
        elif is_md "${devname}" || is_mapper "${devname}" ; then
            if check_dev "null" "${devname}" ; then
                return 0
            fi
        elif [ "${fstype}" = "squashfs" -o \
                "${fstype}" = "ext4" -o \
                "${fstype}" = "ext3" -o \
                "${fstype}" = "ext2" -o \
                "${fstype}" = "btrfs" ]; then
            # This is an ugly hack situation, the block device has
            # an image directly on it.  It's hopefully
            # casper, so take it and run with it.
            ln -s "${devname}" "${devname}.${fstype}"
            echo "${devname}.${fstype}"
            return 0
        fi
    done
    return 1
}
This function probes a block device specified in the kernel command line, if any (usually it’s not specified there). Then, if that didn’t work, the function scans block devices and probes each one until a live file system is found. The “subdevices” function is defined in another script, this function will get and return a list of partitions for a given block device. The “is_nice_device” function is used to check whether or not a given block device (partition) is of the “disk” type (according to a kernel; also, this function will return true if a given block device belongs to the device mapper).
Notice the “ugly hack” situation, where the initramfs script will pick a drive as the boot one without any checks!
The actual probe is performed in the “check_dev” function, here it is:
check_dev ()
{
    sysdev="${1}"
    devname="${2}"
    skip_uuid_check="${3}"
    if [ -z "${devname}" ]; then
        devname=$(sys2dev "${sysdev}")
    fi

    if [ -d "${devname}" ]; then
        mount -o bind "${devname}" $mountpoint || continue
        if is_casper_path $mountpoint; then
            echo $mountpoint
            return 0
        else
            umount $mountpoint
        fi
    fi
    [ -e "$devname" ] || continue

    if [ -n "${LIVEMEDIA_OFFSET}" ]; then
        loopdevname=$(setup_loop "${devname}" "loop" "/sys/block/loop*" "${LIVEMEDIA_OFFSET}")
        devname="${loopdevname}"
    fi

    fstype=$(get_fstype "${devname}")
    if is_supported_fs ${fstype}; then
        devuid=$(blkid -o value -s UUID "$devname")
        [ -n "$devuid" ] && grep -qs "\<$devuid\>" $tried && continue
        mount -t ${fstype} -o ro,noatime "${devname}" $mountpoint || continue
        [ -n "$devuid" ] && echo "$devuid" >> $tried
        if is_casper_path $mountpoint && \
           ([ "$skip_uuid_check" ] || [ "$UUID" = "$devuid" ] || matches_uuid $mountpoint); then
            echo $mountpoint
            return 0
        else
            umount $mountpoint
        fi
    fi

    if [ -n "${LIVEMEDIA_OFFSET}" ]; then
        losetup -d "${loopdevname}"
    fi
    return 1
}
The function checks whether or not a given block device contains a supported file system (the “is_supported_fs” function is defined in another script, it will return true for one of the following file systems: FAT, ISO 9660, UDF, Ext2/3/4, Btrfs, NTFS). If it does contain a supported file system, this block device is mounted with the “ro,noatime” options.
After this, the “is_casper_path” function checks if this mounted file system contains files that look like a root file system image (e.g., the function will check the existence of a file path matching this mask: “/casper/*.squashfs“). If there is such a file, then the UUID check is performed (unless it was disabled on the kernel command line): the UUID check takes an UUID string from the /conf/uuid.conf file in the initramfs (or from the kernel command line, if it includes the “uuid=<UUID>” parameter) and then compares it against a file system UUID. If that fails (not all file systems are capable of storing a valid UUID string in their metadata), the same UUID string is compared against an UUID file in the file system being probed (i.e., the mounted one).
Here is the “matches_uuid” function:
matches_uuid() {
    if [ -z "$UUID" ]; then
        return 0
    fi
    path="$1"
    for try_uuid_file in "$path/.disk/casper-uuid"*; do
        [ -e "$try_uuid_file" ] || continue
        try_uuid="$(cat "$try_uuid_file")"
        if [ "$UUID" = "$try_uuid" ]; then
            return 0
        fi
    done
    return 1
}
An important note: it’s possible to store more than one UUID string in a file system on a boot drive (look at this line again: “for try_uuid_file in “$path/.disk/casper-uuid”*; do“)!
Let’s go back to the “find_livefs” function. The following command is responsible for obtaining a list of block devices to scan:
echo /sys/block/* | tr ' ' '\n' | egrep -v "/(loop|ram|fd|md)"
If we run it against a real system, we will get the output similar to this:
/sys/block/sda
/sys/block/sdb
/sys/block/sdc
So, block devices are probed in the the alphabetical order. Since there is a kernel delay for USB devices to settle (one second by default), internal drives of a computer will be recognized (and have their names assigned) by a kernel before USB drives. Thus, the initramfs scripts will likely probe internal drives before USB drives.
And the conclusion is:
An adversary can write a small malicious file system to one of the internal drives, so that this internal drive will look like a boot drive for a live forensic distribution. This action will result in the initramfs script mounting a root file system image taken from that malicious file system image on the internal drive, but not from the real boot drive.
This creates an opportunity to run malicious code when the execution is transferred to the “/sbin/init” program in the mounted root file system image.
Example
Let’s try to exploit the boot process of PALADIN 7.04 (https://sumuri.com/), which is based on Ubuntu.
The following scenario is considered:
- a live forensic distribution starts from a USB Flash stick;
- a suspect computer contains a drive attached using the SATA interface;
- no other storage devices are attached to this computer.
Since an unmodified ISO 9660 image of PALADIN 7.04 doesn’t boot from a USB stick, it was adapted and written to the USB stick using Rufus (https://rufus.akeo.ie/).
The internal drive was initialized with three partitions: two of them contain NTFS file systems, while the third one, located at the end of the drive, contains a FAT file system.
Before the test, it was confirmed that PALADIN 7.04 can successfully boot from the USB stick (on that computer).
During the test, a set of files mimicking a live file system was written to the the FAT file system of the drive. This set of files includes a SquashFS image, which contains a simple program to print the “I will delete the evidence” message (followed by many dots) to the console, and three files with UUID strings, one of them contains the actual UUID string used by PALADIN 7.04.
An image of this “malicious” file system is available upon request.
The process of booting the suspect computer from that USB Flash stick resulted in the “I will delete the evidence” message appearing on a screen.
A screenshot from a similar test conducted in a virtual machine is shown below.

Other distributions
There are many live distributions based on Linux, many of them are susceptible to the same issue.
For example, in order to locate a live file system, live distributions based on Debian utilize an approach similar to the one implemented in Ubuntu, with the following major difference: all block devices are divided into two groups: removable drives and fixed drives; removable drives are probed before fixed ones. A block device is considered removable if it has a removable flag set (for USB devices, this flag is set according to the RMB bit in the SCSI INQUIRY data). In recent versions of the Debian initramfs scripts (v20161101 or later), a block device is considered removable if it has a removable flag set or if it belongs to a USB/FireWire/MMC device.
Therefore, booting a live forensic distribution based on Debian may result in different probing schemes used. This depends on the type of a boot drive: a USB stick, or a drive in a USB enclosure, or a drive attached to an “internal” interface like SATA. In some cases (e.g., after the poor man’s installation of a live distribution by copying the ISO 9660 image to a partition on an internal HDD), the attack is still possible.
Windows
The same “find the boot drive” problem exists in Windows. When booting from an MBR-partitioned drive in the “Windows To Go” configuration, a boot loader extracts the so-called “disk signature” from a boot drive and calculates a simple checksum for the first sector of that drive. The disk signature and checksum are transferred to a kernel. Later, when native drivers are loaded, a kernel is using this signature and this checksum to locate a boot drive.
Since the disk signature contains a unique value written when the drive is formatted, an adversary must read this value before setting up a malicious file system. Also, an adversary must know the exact partition layout of a boot drive. This makes the attack impractical in most cases.
However, the attack can be mounted in a courtroom: in order to demonstrate the weaknesses of an acquisition tool, an expert hired by an opposite side can take a USB Flash drive you used during the acquisition, read the disk signature and calculate the checksum, and then use this information to set up a malicious file system. This will likely end up in a Windows operating system executing malicious code from a suspect drive. The word “likely” is used here because, according to my tests, a Blue Screen of Death is possible too.
It should be noted that many live forensic distributions based on Windows don’t use the “Windows To Go” configuration. For example, a Windows FE image is built by incorporating custom changes and software into the “BOOT.WIM” image, which is loaded by a boot loader, not by a kernel. Thus, there is no need for a kernel to locate a boot drive (because the whole environment is loaded into RAM by a boot loader).
Mitigations
The following mitigations are possible:
- Allow an end user to modify a live forensic distribution to include a unique random value, which is unknown to an adversary and which is used to verify the authenticity of a live file system found. The algorithm to store and verify this unique random value is similar to the UUID check described above, but such a value should be unique to each end user (while an UUID value is unique to each build of a live distribution produced by a vendor). This mitigation was implemented in Grml (there is a script for an end user to generate a custom ISO 9660 image from a stock one).
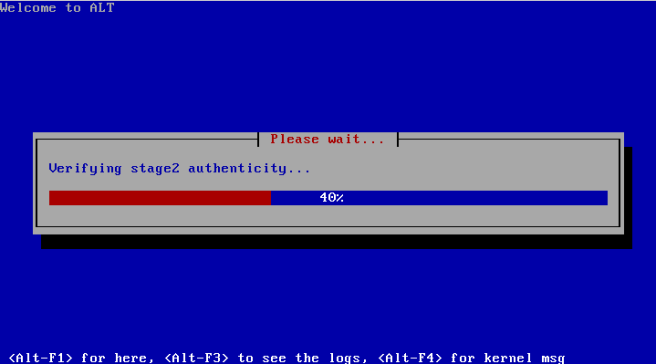
- Include a hash value to validate the authenticity of a root file system image chosen during the boot. This hash value can be specified as a part of the kernel command line; programs in the early userspace must use it to validate the authenticity of a root file system image before executing the “/sbin/init” file from that file system (or even before the image is mounted). This mitigation was implemented in ALT Linux Rescue (as shown on a screenshot below). Also, this mitigation can be implemented using the “dm-verity” functionality.
Also, the whole live system can be stored in the initramfs image. In this setup, there is no need to search for a boot drive, but it’s impossible to boot such a system on a computer with a limited amount of RAM (because the whole live system should be read into RAM by a boot loader).
It should be noted that the “Secure Boot” feature can’t be used to mitigate the attack (if this feature is present and enabled on a suspect computer). Currently, no facilities to validate the integrity of a root file system image are implemented in major live distributions (thus, a signed kernel using a signed initramfs image is capable of running unverified code from a root file system image).
A funny story:
The attack described in this blog post was reported to Guidance Software many years ago. They rolled an updated version of the LinEn boot CD (it’s based on KNOPPIX; also, this distribution can be started from a USB stick if the ISO 9660 image is converted to the hybrid one) with the hash-based validation of a root file system image.
After mounting the validated root file system, KNOPPIX scripts are searching the boot drive for archives containing updates to the live system. If found, these archives are extracted (no user confirmation required) and their files replace corresponding files in the live system. Of course, there were no checks to validate these archives.
So, an attacker can grab an original root file system image, copy it to a malicious file system on a suspect drive together with an archive containing a malicious LinEn executable (which will replace the original LinEn program when extracted during the boot).
Don’t make similar mistakes!
Going deep
It was found that some live distributions running in the UEFI mode ignore a boot drive detected by a boot loader using the method explained above. Instead of using a detected boot drive, a boot loader runs a simple script to scan available drives in order to locate a boot drive.
For example, in Grml 2017.05, the following script is executed by the GRUB boot loader (the UEFI mode):
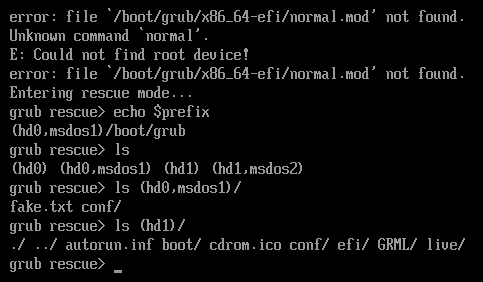
search.file /conf/bootid.txt root
set prefix=($root)/boot/grub
insmod normal
normal
echo "E: Could not find root device!"
This script is searching for a boot drive by scanning all file systems for the “/conf/bootid.txt” file. If this file is found, then a corresponding file system is considered to reside on a boot drive (and a boot drive reported by the firmware is ignored).
Depending on the UEFI implementation, a file system on a USB device can be enumerated after a file system on an internal drive (or vice versa). Thus, a boot loader running from a USB stick may scan internal drives first; in this situation, a similar attack is possible against a boot loader.
The attacker, however, is able to substitute a kernel and an initramfs image, as well as information in a configuration file of GRUB (like the kernel command line, thus bypassing possible integrity checks performed by a kernel or an initramfs program).
A screenshot below shows the GRUB boot loader failed to locate a right boot drive (“hd1”). A wrong boot drive (“hd0”) was chosen by the script; since this drive doesn’t have the required files, the boot loader failed to display a menu.
Are there any other implications?
Yes!
Mounting a file system with the “ro,noatime” options will modify the data in some situations. Because of this, booting a live forensic distribution may change the data on a suspect drive.
A future post will be dedicated to this problem. Stay tuned!
P.S. Before you mention a hardware write blocker as a mitigation measure: a lengthy post about hardware write blockers is scheduled too!

Hi Maxim, excellent article.
If it’s possible, I would like to have an image of the “malicious” file system for a proof of concept.
Thanks.
LikeLike
Thank you!
The image is here: https://github.com/msuhanov/articles/raw/master/misc/fake-pldn.raw.gz
LikeLike